# 项目介绍
Mars3D通用项目模版 是基于Mars3D 平台 (opens new window)做的一个应用系统, 提供的一个通用项目模版,包含常用基础地图功能,可在该通用项目模版上快速开发搭建新项目。方便快速搭建三维地图产品,敏捷开发,可复用,支持各种配置,适合各种场景使用。
# 项目特性
- 最新技术栈:使用 Vue3/Vite 等前端前沿技术开发
- TypeScript: 应用程序级 JavaScript 的语言
- 适用于地图场景的widget模块化: 继续沿用了原生 JS 版本 widget 架构的一些思想,使用 vue 方式实现了各 widget 功能
如果您不熟悉Vue,也可以阅读:通用项目模版原生JS版 、通用项目模版React版
# 视频讲解
建议先看一遍视频讲解,再实际操作。您可以
视频预览:
# 下载运行项目
# 下载代码
git clone https://github.com/marsgis/mars3d-vue-project.git
- Gitee (opens new window):国内码云,下载速度快些。
git clone https://gitee.com/marsgis/mars3d-vue-project.git
# 运行环境
- 推荐使用 vscode,安装参考开发环境搭建教程
- 安装 vscode 插件,推荐安装 volar(并禁用 vetur)、ESlint 、 Prettier
- 配置 vscode 参数, setting.json相关配置
{
  "eslint.format.enable": true,
  "[json]": {
    "editor.defaultFormatter": "esbenp.prettier-vscode"
  },
  "[typescript]": {
    "editor.defaultFormatter": "esbenp.prettier-vscode"
  },
  "[javascript]": {
    "editor.defaultFormatter": "esbenp.prettier-vscode"
  },
  "[html]": {
    "editor.defaultFormatter": "esbenp.prettier-vscode"
  },
  "[vue]": {
    "editor.defaultFormatter": "esbenp.prettier-vscode"
  }
}
2
3
4
5
6
7
8
9
10
11
12
13
14
15
16
17
18
- 安装ESLint (opens new window) 插件后,将如下代码加入到settings.json中,可实现保存时,eslint自动修复错误。
 // 当保存时,eslint自动帮我们修复错误
  "editor.codeActionsOnSave": {
    "source.fixAll": "explicit"
  },
  // 保存代码,不自动格式化
  "editor.formatOnSave": false
2
3
4
5
6
- 重启VSCode
# 运行命令
请将机器Node版本升级到v16及以上版本
# 首次运行前安装依赖
npm install

//或使用代理
npm i --registry=http://registry.taobao.org
2
3
4
# 启动开发环境
npm run serve
# 编译构建
npm run build
# 运行效果
访问通用项目模版 Vue 版 (opens new window) 在线体验效果和功能

如果需要所有功能模块的widget和其他一些项目模板,需要联系我们付费购买 (opens new window)
# 浏览器支持
推荐使用Chrome 90+ 浏览器, 建议升级浏览器到最新版本访问。
| IE | Edge | Firefox | Chrome | Safari |
|---|---|---|---|---|
| not support | last 2 versions | last 2 versions | last 2 versions | last 2 versions |
# 如何反馈问题?
- 发现您发现项目中存在的问题或者需要优化的地方;
- 如果您有一些自己全新编写的示例,希望也开源与大家分享。
提交方式:
- 欢迎在 github 或 gitee 上提交 PR (opens new window)
- 如果对 git 不熟悉,也可以整理示例代码发送邮件到 wh@marsgis.cn 由我们来整理集成。
# 项目架构
# 主要技术选型
- Vue3 (opens new window):开发框架
- TypeScript (opens new window): 开发语言
- Ant Design Vue (opens new window):控件UI库
- IconPark (opens new window):图标UI库
# 基础技术环境
- Node (opens new window) 和 git (opens new window) :运行环境(了解npm、git命令)
- ES6+ (opens new window) :熟悉 es6 基本语法
- Vite (opens new window):开发环境
- ESlint (opens new window):代码检查工具
需要有一定的知识储备,包括 vue3.0 中的 composition Api 模式等,建议浏览下Web 前端知识视频讲解 (opens new window)
# 主要目录说明
mars3d-vue-project
└───src                 主要项目代码
│   └───common          公共核心文件
│   └───components      公共组件
│   └───directive       指令
│   └───misc            ts模块定义
│   └───pages           页面入口
│   └───utils           工具方法
│   └───widget          功能相关的widget控件【重要】
│
└───public              静态资源
│   └───config          地图的配置文件等
│   └───img             图片资源
│
│─── .eslintrc.js        eslint配置文件
│─── package.json        项目配置信息
└─── vite.config.ts      vite 配置文件
└─── tsconfig.js         ts 配置文件
└─── *.html              各页面入口
2
3
4
5
6
7
8
9
10
11
12
13
14
15
16
17
18
19
# 功能主目录
项目所有功能主要在 src/widgets/*/*目录下,每一个功能对应了叶子目录下的一个index.vue和 map.ts 文件,复杂的 widget 目录下也会有相关子组建 xxx.vue。
vue下的 widget 设计,沿用了我们 原生JS版通用项目模版的设计理念:
- 所有的 widget 都是按需加载
- 只需要通过简单的配置,即可控制不同业务面板间的互斥关系
- 提供 api 可以手动的控制面板的显示隐藏
# widget 配置参数
widget 加载相关的代码在 src/common/store/widget.ts下,使用的 vuex 管理相关状态,默认状态字段有
// 为 store state 声明类型
export interface DefaultOption {
  autoDisable?: boolean
  disableOther?: boolean | string[]
  group?: string // group相同的widget一定是互斥的
  meta?: any // 额外参数 不会在每次关闭后清除
}

export interface Widget {
  name: string // 唯一标识
  key?: string // 作为vue diff 环节的key,用于控制组件重载
  component?: any // widget关联的异步组件
  autoDisable?: boolean // 是否能够被自动关闭
  disableOther?: boolean | string[] // 是否自动关闭其他widget,或通过数组指定需要被关闭的widget
  group?: string // group相同的widget一定是互斥的
  visible?: boolean // 显示隐藏
  data?: any // 额外传参 会在每次关闭后清除
  meta?: any // 额外参数 不会在每次关闭后清除
}

export interface WidgetState {
  widgets: Widget[] // widget具体配置
  openAtStart: string[] // 默认加载的widget
  defaultOption?: DefaultOption // 支持配置默认参数
}
2
3
4
5
6
7
8
9
10
11
12
13
14
15
16
17
18
19
20
21
22
23
24
25
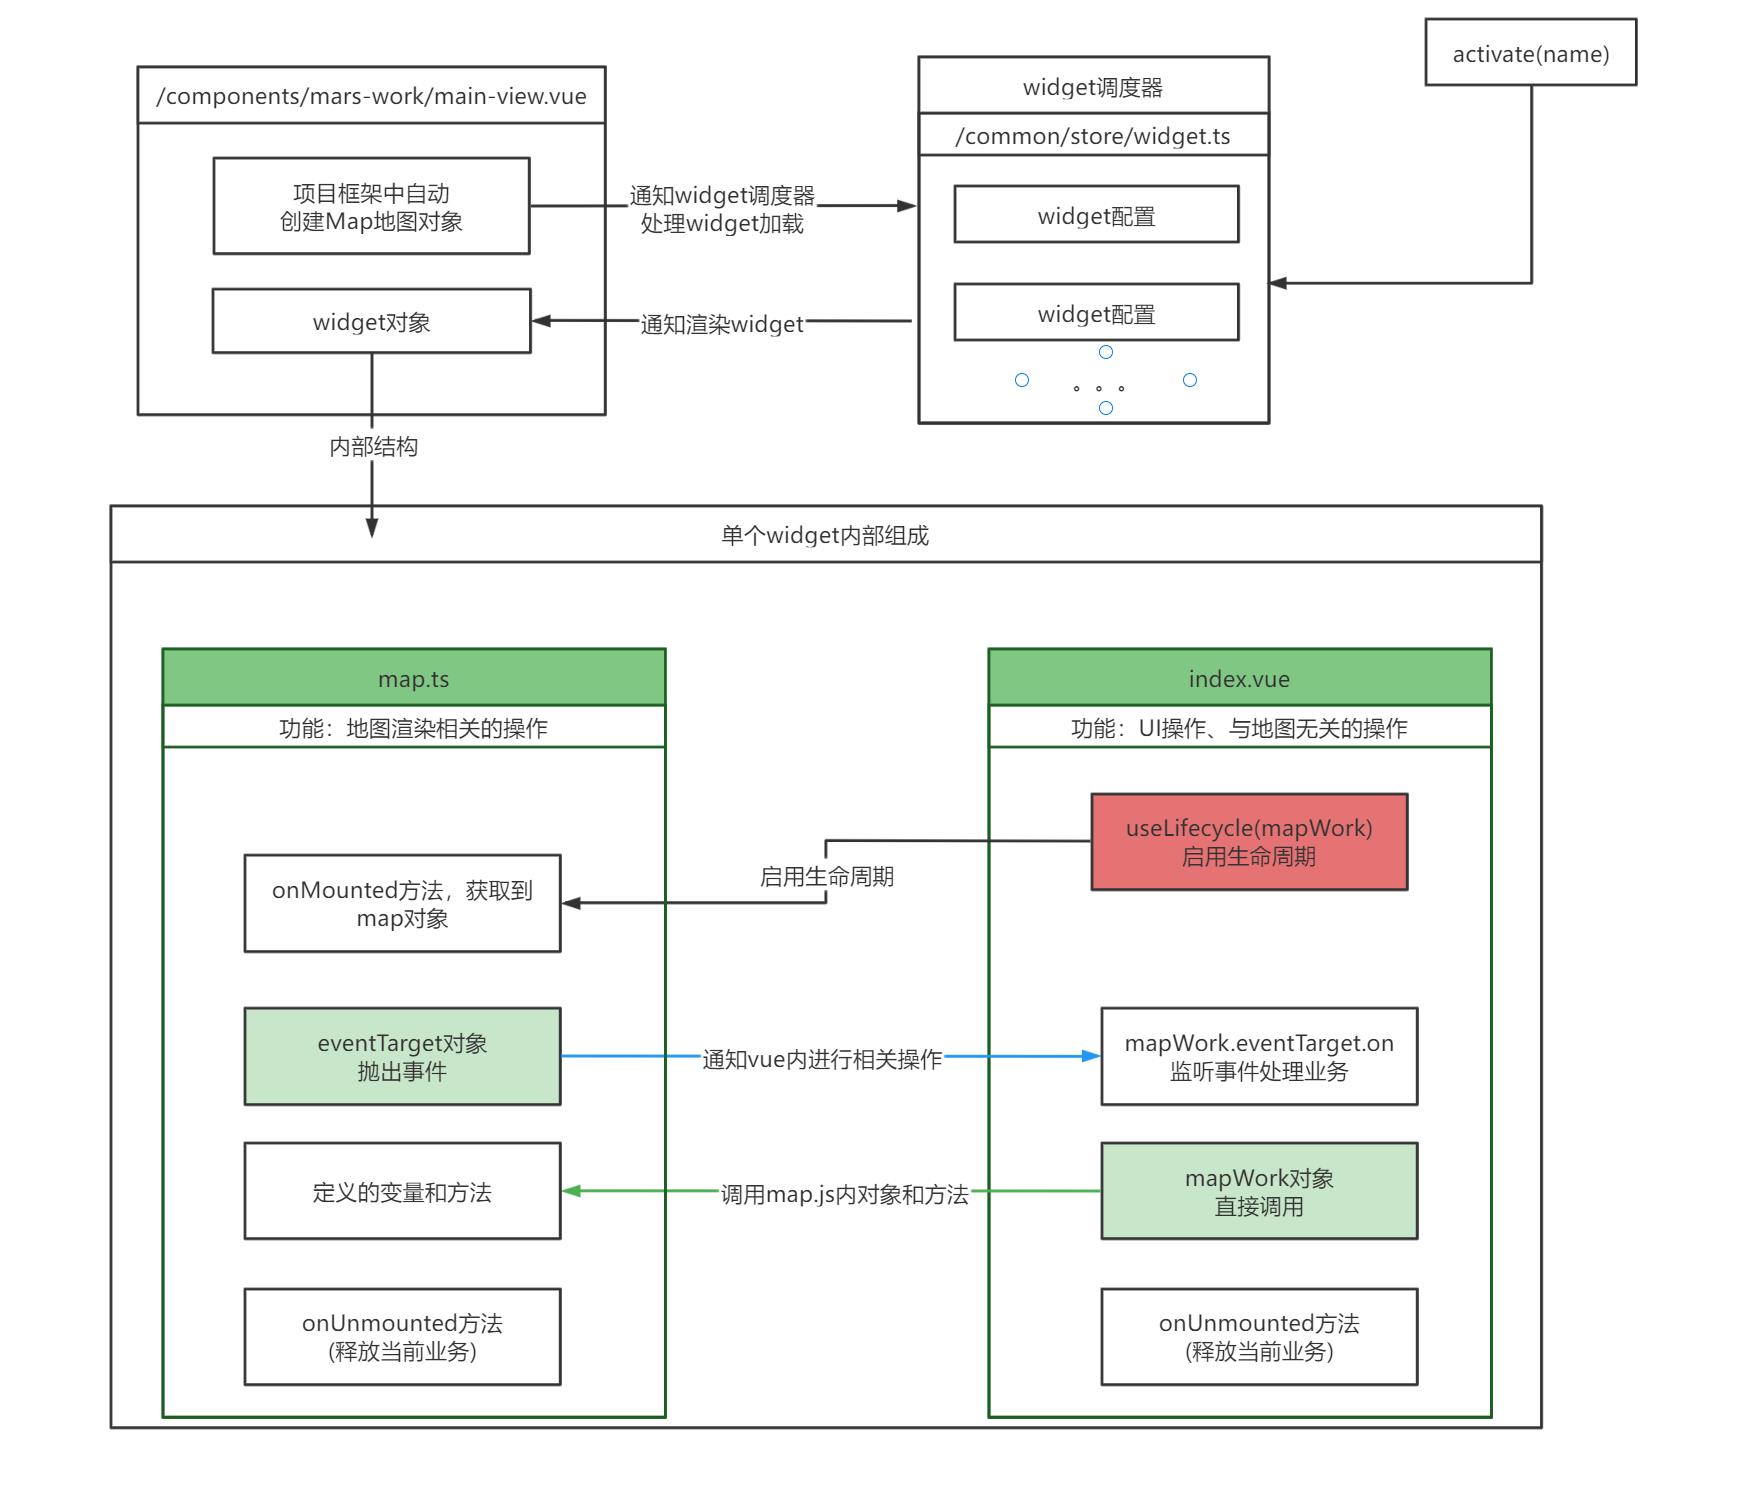
# widget 构流程图
示例的内部构造处理流程图:

# 如何增加新的 widget
下面我们以 src/widgets/demo/sample-dialog/ 为示例做讲解
# 1.创建示例
在 widgets 目录下按项目需要建立好多层目录,比如我们将测试和演示的 widget 放在src/widgets/demo目录下面,通用项目模版的功能放在src/widgets/basic目录下。
首先建立后 sample-dialog 目录,并参考已有示例新建index.vue 和 map.ts 2 个文件。
# index.vue
index.vue 完整代码为:
<template>
  <mars-dialog title="弹窗标题" width="300" height="400" top="400" bottom="10" :right="10">
    <a-row :gutter="5">
      <a-col :span="19">
        <mars-input v-model:value="extent" :allowClear="true"></mars-input>
      </a-col>
      <a-col :span="5">
        <a-space size="small">
          <mars-button class="small-btn" @click="onClickDrawExtent">绘制</mars-button>
        </a-space>
      </a-col>
    </a-row>
    <template #icon>
      <bookmark-one theme="outline" size="18" />
    </template>
  </mars-dialog>
</template>

<script setup lang="ts">
import { onUnmounted, ref } from "vue"
import useLifecycle from "@mars/common/uses/use-lifecycle"
import MarsDialog from "@mars/components/mars-work/mars-dialog.vue"
import * as mapWork from "./map"

// 启用map.ts生命周期
useLifecycle(mapWork)

const extent = ref("")

// 渲染模型
const onClickDrawExtent = () => {
  // formState.extent = "测试组件内部数据是否响应"
  mapWork.drawExtent()
}
mapWork.eventTarget.on("drawExtent", function (event: any) {
  extent.value = event.extent
})

onUnmounted(() => {
  // 销毁操作
})
</script>
<style lang="less"></style>
2
3
4
5
6
7
8
9
10
11
12
13
14
15
16
17
18
19
20
21
22
23
24
25
26
27
28
29
30
31
32
33
34
35
36
37
38
39
40
41
42
43
其中:
# mars-dialog.vue
mars-dialog 是弹窗组件,我们 widget 内可以按需选择下面 2 个使用:
- mars-dialog 弹框 组件:
src/components/mars-work/mars-dialog.vue - mars-pannel 普通面板组件:
src/components/mars-work/mars-pannel.vue
mars-dialog 支持的配置参数包括:
interface Props {
  warpper?: string // 容器id 默认是app,将作为定位的参照元素,一般不需要修改
  title?: string // 弹框标题
  visible: boolean // 是否显示
  width?: number | string // 初始宽度
  height?: number | string // 初始高度
  left?: number | string // 定位 left值
  right?: number | string // 定位right值
  top?: number | string // 定位top值
  bottom?: number | string // 定位bottom值
  handles?: boolean | string // 缩放控制器 默认 [x, y, xy]
  minWidth?: number // 最小宽度
  minHeight?: number // 最小高度
  maxWidth?: number // 最大宽度
  maxHeight?: number // 最大高度
  zIndex?: number // 层级
  customClass?: string // 自定义class
}
2
3
4
5
6
7
8
9
10
11
12
13
14
15
16
17
18
# 配置 widget 的 props 参数
widget 的 prop 参数默认有四中配置方式,默认情况下优先级从低到高分别为 内联 prop、defaultOption 中的 props、meta 中的 props 配置,动态传参,使用方式如下
<!-- 内联 -->
<mars-dialog title="图上量算" width="300" height="530" top="50"></mars-dialog>
2
// defaultOption中 注意 必须是meta
const store: StoreOptions<State> = {
  state: {
    defaultOption: {
      meta: {
        props: {
          top: 110
        }
      }
    },
    widgets: []
  }
}
2
3
4
5
6
7
8
9
10
11
12
13
// meta中
widgets = [
  {
    component: markRaw(defineAsyncComponent(() => import("@mars/widgets/hello.vue"))),
    name: "hello",
    autoDisable: true,
    meta: {
      props: {
        top: 70
      }
    }
  }
]
2
3
4
5
6
7
8
9
10
11
12
13
// 动态传参
activate({
  name: "hello",
  data: {
    props: {
      top: 70
    }
  }
})
2
3
4
5
6
7
8
9
以上均为默认情况下的处理,再某些特殊情况下,可以在 widget 中通过下面这种方式,强制将内联 props 的优先级提升到最高
<mars-dialog v-bind="attrs" title="hello" width="300" height="530" top="50" :right="10" :min-width="297"></mars-dialog>

<script>
  import { useAttrs } from "vue"
  const attrs = useAttrs()
</script>
2
3
4
5
6
# useLifecycle
vue 中需要调用地图方法时,需得启用 map.ts 的生命周期,并且在 map.ts 生命周期中获取 map 对象。
// vue中
import useLifecycle from "@mars/common/uses/use-lifecycle"
import * as mapWork from "./map"

// 启用map.ts生命周期
useLifecycle(mapWork)
2
3
4
5
6
注意:
- 开启生命周期的操作只需要在 index.vue 中执行,子组件不需要
- 尽量不要在 vue 的生命周期中操作 map,或者调用 map.ts 中操作 map 的函数,此时操作不能保证 map 存在
# map.ts
map.ts 完整代码为:
import * as mars3d from "mars3d"

export let map: mars3d.Map // 地图对象

// 事件对象,用于抛出事件给vue
export const eventTarget = new mars3d.BaseClass()

// 初始化当前业务
export function onMounted(mapInstance: mars3d.Map): void {
  map = mapInstance // 记录map
}

// 释放当前业务
export function onUnmounted(): void {
  map = null
}

// 绘制矩形(演示map.js与index.vue的交互)
export function drawExtent(): void {
  map.graphicLayer.clear()
  // 绘制矩形
  map.graphicLayer.startDraw({
    type: "rectangle",
    style: {
      fill: true,
      color: "rgba(255,255,0,0.2)",
      outline: true,
      outlineWidth: 2,
      outlineColor: "rgba(255,255,0,1)"
    },
    success: function (graphic: mars3d.graphic.RectangleEntity) {
      const rectangle = graphic.getRectangle({ isFormat: true })
      eventTarget.fire("drawExtent", { extent: JSON.stringify(rectangle) }) // 抛出事件,可以vue中去监听事件
    }
  })
}
2
3
4
5
6
7
8
9
10
11
12
13
14
15
16
17
18
19
20
21
22
23
24
25
26
27
28
29
30
31
32
33
34
35
36
其中:
# onMounted
初始化当前地图业务的钩子方法,可以通过 onMounted 函数的获取到 map 主对象。
export function onMounted(mapInstance: mars3d.Map): void {
  map = mapInstance // 记录map 初始化当前业务
}
2
3
如果未调用,请请参考之前的步骤,检查是否正常使用useLifecycle(mapWork)启用生命周期
# onUnmounted
释放当前地图业务的钩子方法, 一般在 onMounted 添加的图层、绑定的事件,在 onUnmounted 中都需要做相反的移除、解绑等操作。
export function onUnmounted(): void {
  map = null // 释放当前业务
}
2
3
# map.ts和index.vue各自代码业务分离的原则
- 涉及地图业务的操作均写在 map.ts 中
- 涉及 UI 层面、和地图无关的操作均写在 index.vue 中,vue 中尽量不使用 mars3d 和 Cesium 开头的类
# index.vue 与 map.ts 交互
- index.vue 直接调用 map.ts 中 导出的函数或对象
- index.vue 调用 map.ts 中的函数拿到返回值,继续后续处理,异步操作返回值可以是 Promise
- map.ts 主动触发 ui 变化,通过 mars3d.BaseClass 事件中心处理。如
// map.ts
export const eventTarget = new mars3d.BaseClass()

function change() {
  mapWork.eventTarget.fire("change", { value: "hello change" })
}

// index.vue
import * as mapWork from "./map"
const change = (e: any) => {
  console.log(e)
}
mapWork.eventTarget.on("change", change)

onUnmounted(() => {
  mapWork.eventTarget.off("change", change) // 注意:请及时销毁事件绑定
})
2
3
4
5
6
7
8
9
10
11
12
13
14
15
16
17
# 2.相关页面加入菜单入口
# store.ts 清单配置
在对应 page 页面下的 src/pages/demo/widget-store.ts 中,需要配置刚才新建的 widget 相关信息;
import { defineAsyncComponent, markRaw } from "vue"
import { WidgetState } from "@mars/common/store/widget"
import { StoreOptions } from "vuex"

const store: StoreOptions<WidgetState> = {
  state: {
    //已忽略其他配置
    widgets: [
      {
        component: markRaw(defineAsyncComponent(() => import("@mars/widgets/demo/sample-dialog/index.vue"))),
        name: "sample-dialog"
      }
    ]
  }
}
export default store
2
3
4
5
6
7
8
9
10
11
12
13
14
15
16
其中 state 下的配置参数参考
widget 配置参数
更多参数建议阅读源码的
src/common/store/widget.ts(教程可能滞后,请参考源码注释为准)
# 菜单或其他入口文件中
在需要的菜单单击事件或其他对象触发代码中,加入activate('sample-dialog')来激活我们刚加入的控件,
下面已目录为例:
在widgets/demo/menu/index.vue中加入“弹窗示例”按钮,按钮单击事件调用对应方法,
activate 和 disable 函数支持 string(直接传递 name) 和 Widget(传递 widget 对象,将会合并传递的属性,必须包含 name 字段) 类型的参数,上述 name 字段与 store.ts 中的 name 需要一致。
<template>
  <mars-pannel>
    <a-space>
      <mars-button @click="show('sample-pannel')">面板示例</mars-button>
      <mars-button @click="show('sample-dialog')">弹窗示例</mars-button>
      <mars-button @click="show('ui')">UI面板</mars-button>
    </a-space>
  </mars-pannel>
</template>

<script setup lang="ts">
import MarsPannel from "@mars/components/mars-work/mars-pannel.vue"
import { useWidget } from "@mars/common/store/widget"

const { activate } = useWidget()

const show = (name: string) => {
  activate(name)
  // 或
  activate({
    name
  })
}
</script>
<style lang="less"></style>
2
3
4
5
6
7
8
9
10
11
12
13
14
15
16
17
18
19
20
21
22
23
24
25
# 将当前项目集成到自己的项目中(合并 2 个项目)
可以参考已集成好的mars3d-vue-project-admin项目: github:vue-mars3d-admin (opens new window)、 gitee:vue-mars3d-admin (opens new window)
前提条件:需要 2 个项目的技术栈基本是一致的,比如
vue3+ts+ant-design-vue等
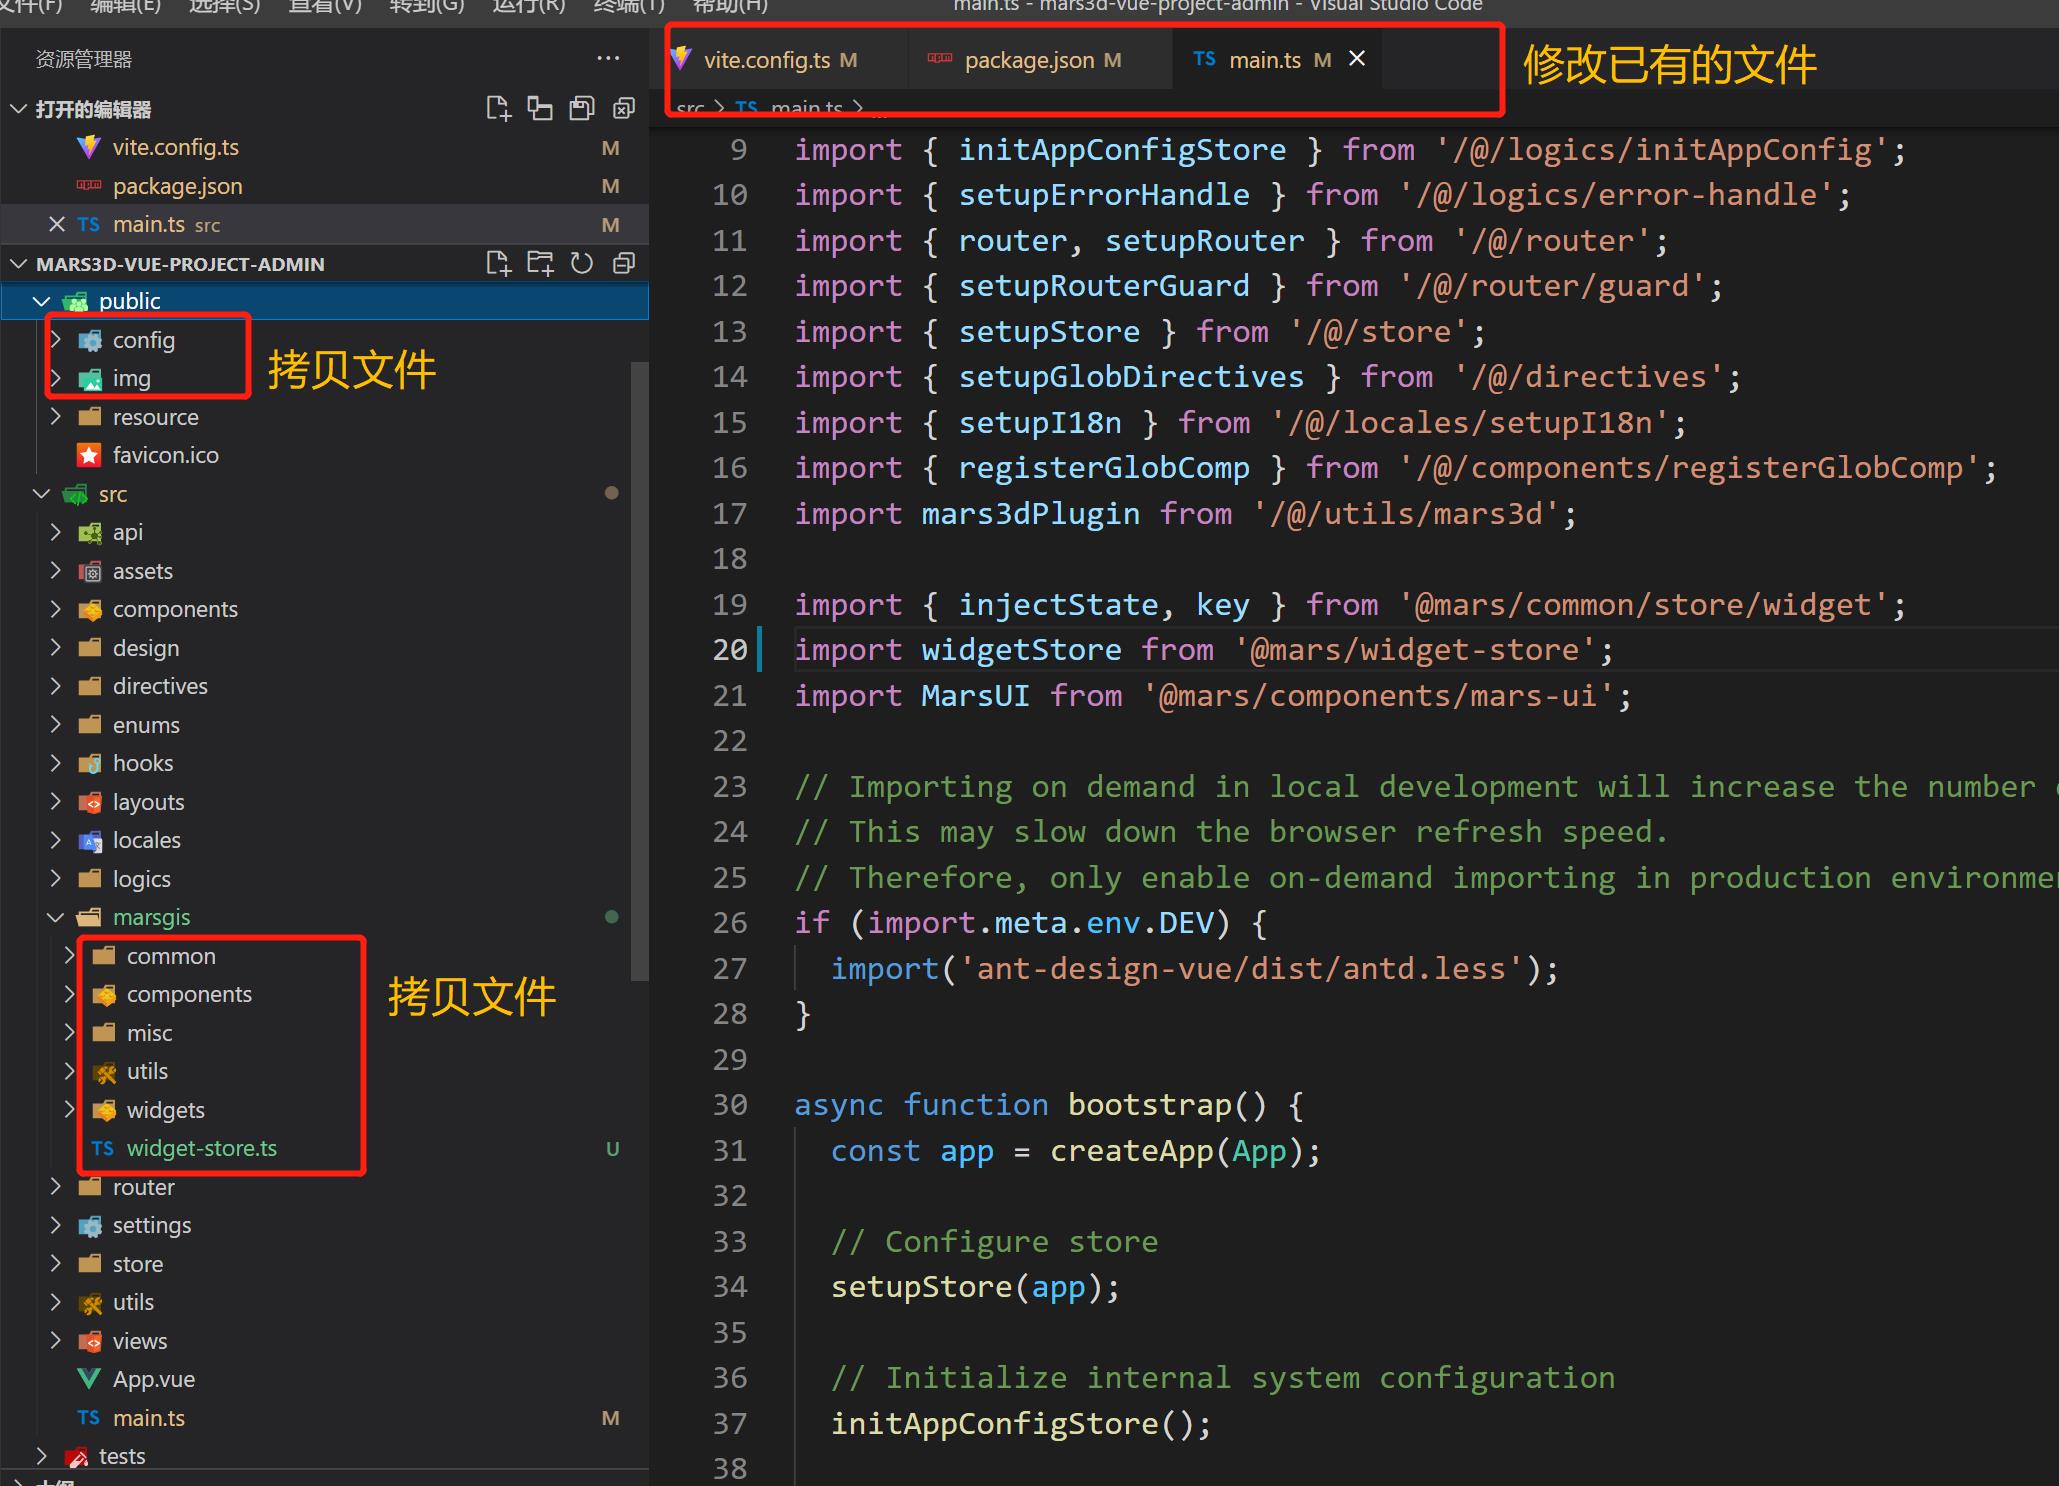
# 流程概览:
需要拷贝的目录和文件:
/src/拷贝到/src/marsgis/public/拷贝到/public//src/pages/index/widget-store.ts拷贝到/src/marsgis/widget-store.ts
需要修改自己项目的文件:
package.jsonvite.config.ts或vue.config.jssrc/main.js- 需要加地图的
vue文件

# 1. 拷贝通用项目模版 src 代码
在原有项目中新建目录src/marsgis,将通用项目模版 src 代码拷贝到src/marsgis目录下面,其中 pages 目录非必须,可以按需拷贝。
# 2. 拷贝 public 下的资源
将通用项目模版public下所有文件拷贝到自己项目的public目录下。
# 3. package.json 依赖的融合
复制 package.json 依赖包,保证依赖存在且版本正确。
// dependencies中添加
{
  "mars3d": "~3.6.0",
  "mars3d-cesium": "~1.124.0",
  "@turf/turf": "^7.1.0",
  "kml-geojson": "^1.2.0",
  "vue": "^3.5.13",
  "vuex": "^4.0.2",
  "vue-color-kit": "^1.0.5",
  "axios": "^0.23.0",
  "core-js": "^3.6.5",
  "ant-design-vue": "^3.2.5",
  "@icon-park/vue-next": "^1.3.5",
  "nprogress": "^0.2.0",
  "echarts": "^5.2.2",
  "localforage": "^1.10.0"
}
2
3
4
5
6
7
8
9
10
11
12
13
14
15
16
17
# 4. 修改项目别名等配置
修改vite.config.ts 或 vue.config.js 配置文件中的项目别名配置和 process 相关配置
alias: {
  {
    find: /@mars\//,
    replacement: pathResolve('src/marsgis') + '/',
  }
}

define: {
  'process.env': {
    BASE_URL: '/',
  },
}
2
3
4
5
6
7
8
9
10
11
12
# 5. 修改初始化相关依赖
将src/pages/index/widget-store.ts配置文件拷贝src/marsgis/widget-store.ts位置。
再在src/main.js文件中加载和初始化相关依赖。
import { injectState, key } from "@mars/common/store/widget"
import widgetStore from "@mars/widget-store"
import MarsUI from "@mars/components/mars-ui"

app.use(MarsUI)
app.use(injectState(widgetStore), key)
2
3
4
5
6
# 6.复制对应 vue 页面代码
复制对应页面代码到组件中, 例如拷贝 src/pages/index/App.vue 代码到自己项目需要展示地图的 vue 文件中。
# 7. 合并项目规范等配置信息(可选)
如果没有下面文件,可以直接拷贝到自己项目中, 如果已有对应文件,可以对比参数,按需拷贝相关配置进已有文件中。
- 复制
/.editorconfig文件到src/marsgis/目录下 - 复制
/.eslintrc.js文件到src/marsgis/目录下 - 复制
/.prettierrc文件到src/marsgis/目录下 - 修改
/tsconfig.json文件
如果项目中采用的 eslint 标准库与通用项目模版不一致,则根据提示安装对应的依赖,相关依赖如下, 按照项目实际情况安装,并作相应调整.
# 8. 处理样式冲突
通用项目模版已经基本保证不会影响外部样式,此处要处理的是您项目中的全局样式对 mars3d 相关组件的影响。修改相关 CSS 保证通用项目模版功能 UI 正常即可。
# 开发中常见问题
# 1. 如何切换mars3d到授权版
请访问 替换本地SDK为授权版 了解详情。
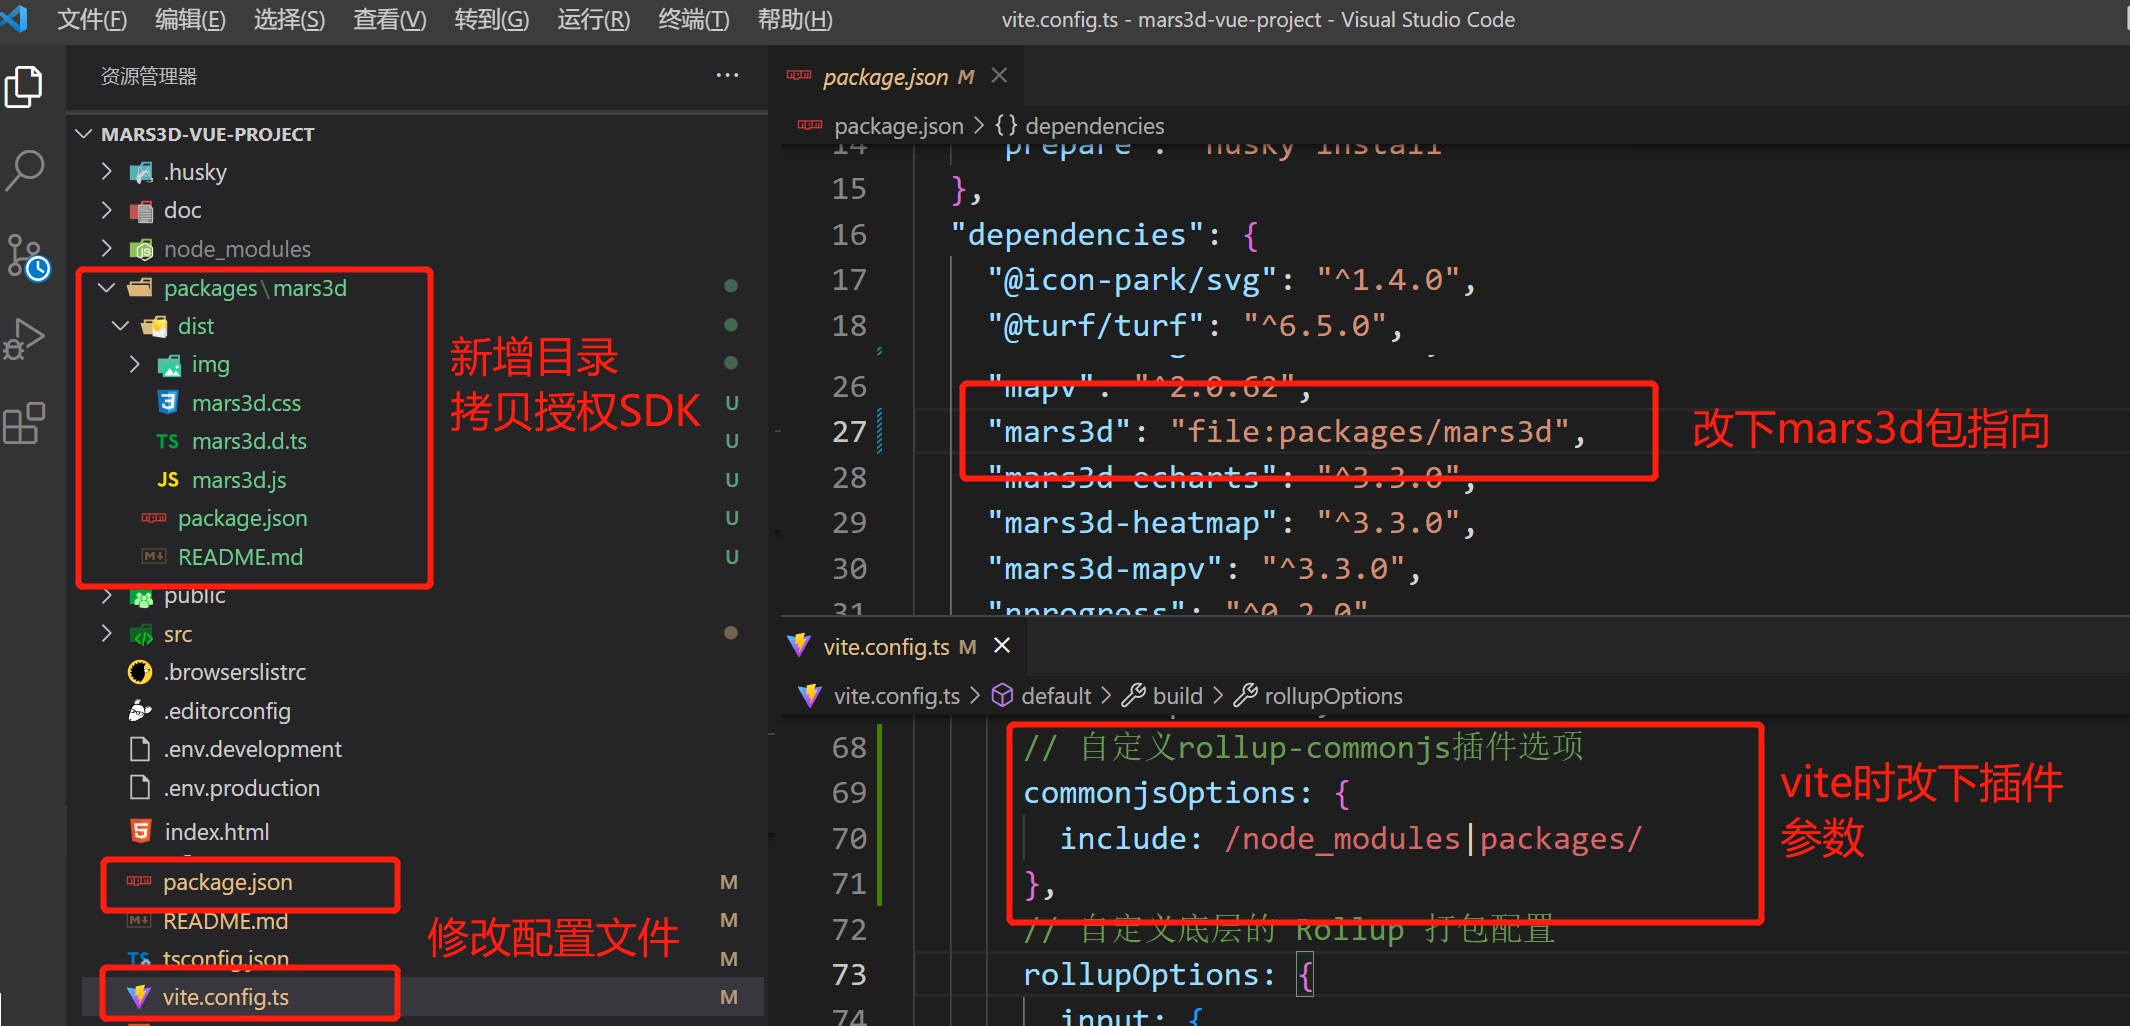
步骤:
- 确保项目在使用npm免费版本mars3d时正常运行。
- 在项目根目录创建
/packages/目录 - 覆盖授权版:将
mars3d-sdk授权版.zip离线包放到packages目录,并解压到当前目录下,解压后packages的目录结构为:
/mars3d-vue-project
 └─ packages
   └─ mars3d
     ├─ img
     ├─ mars3d.js
     ├─ mars3d.d.ts
     ├─ mars3d.js
     └─ package.json  #必须有
2
3
4
5
6
7
8
- 修改链接:修改
package.json中mars3d包配置为:"mars3d": "file:packages/mars3d", - 【重要】删除
node_modules重新npm install安装依赖

# 2. 局域网离线使用时注意事项
平台所有代码层面来说支持离线运行和使用的,但需要注意的是离线时的地图服务的相关处理。
如果局域网内有相关地形、卫星底图服务可以按内网服务类型和 URL 地址替换下config.json或构造Map的代码中的默认地形和底图。
如果局域网内没有相关服务,可以按下面处理:
- 修改 config.json 中
terrain配置中,将已有的"show": true配置,改为"show": false - 修改 config.json 中
basemaps数组配置中,将已有的"show": true的图层,将该值改为"show": false,并将单张图片或离线地图加上"show": true,并修改相关 URL 地址。 - 您也可以参考教程发布三维数据服务进行部署离线地图服务,里面也有一些示例离线数据。
